
Learn how to use Easy Dental to send an email to everyone who has an email address on file.
There may be times when you need to close your practice or make changes to your schedule and need a way to let your patients know about those changes. Email is an efficient way to do that.
There are a few different ways you can send an email with Easy Dental, depending on which email service you use.
Click the option below that applies to your practice to learn how.
- I have Easy Dental and Easy Dental Communication Manager
- I have Easy Dental and use Microsoft Outlook for email
- I have Easy Dental and use a web-based email service (Gmail, Yahoo, Outlook.com, etc.)
Easy Dental and Easy Dental Communication Manager
If you have Easy Dental Communication Manager, you can email a newsletter to all of your patients with an email address in the Patients module.
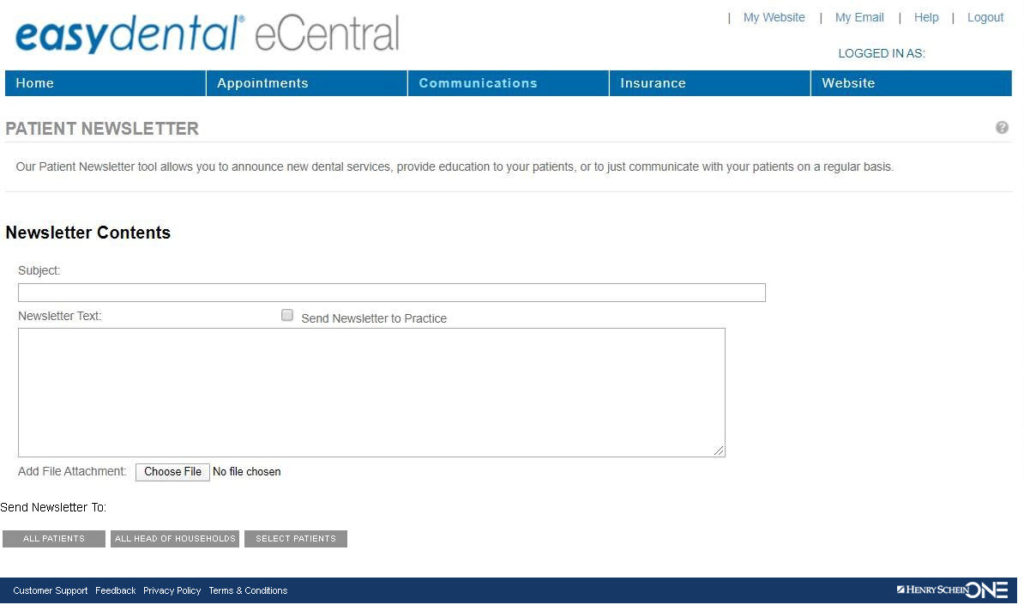
To create send a newsletter through email, from the Easy Web Toolbar, click Communications Manager and select Patient Newsletter from the menu.
Next, enter your email subject. Select Send Newsletter to Practice if you want the office to receive a copy of the newsletter. It will send to the office email that is configured in your account settings.
Then, type the body of the message. Note that this feature is designed to send basic text only; don’t use URLs or special characters here, or you may receive an error message when you try to send it. Do not include an attachment with the email.
Finally, choose who to send the newsletter to. If you want to send the newsletter to all patients, click Select Patients and choose a range of From: “a” to To: “z.” Once the list loads, click Select All, then Send Newsletter.
Note: Do not use the All Patients button. This option may result in an error since it will try to send the message to all email accounts in the database, even if they contain invalid email addresses.
Easy Dental and Microsoft Outlook
If you have Easy Dental and use the full version of Microsoft Outlook for your email service (not the outlook.com web service), you can send emails using the Easy Dental Letters feature with Microsoft Word and the Microsoft Outlook Mail Merge Wizard feature.
Note: To do this, you must have your business email account configured through Microsoft Outlook. When you send messages, it will use your primary Microsoft Outlook account and display the account name and return email address to your patients as it is entered there.
Step 1: Generate a List of Patients
In Reports, click Letters. Choose a category (for example, Misc.). Click New. Across the top of the Patient Report View, enter a name for this list (for example, “Email List”).
In the Merge Data File Name field, type “email.out”. In the Merge Letter Template field, type “email.doc”.
Below this are two tabs. Begin in the Patient Filters tab. This area allows you to set up filters that choose who should receive this message.
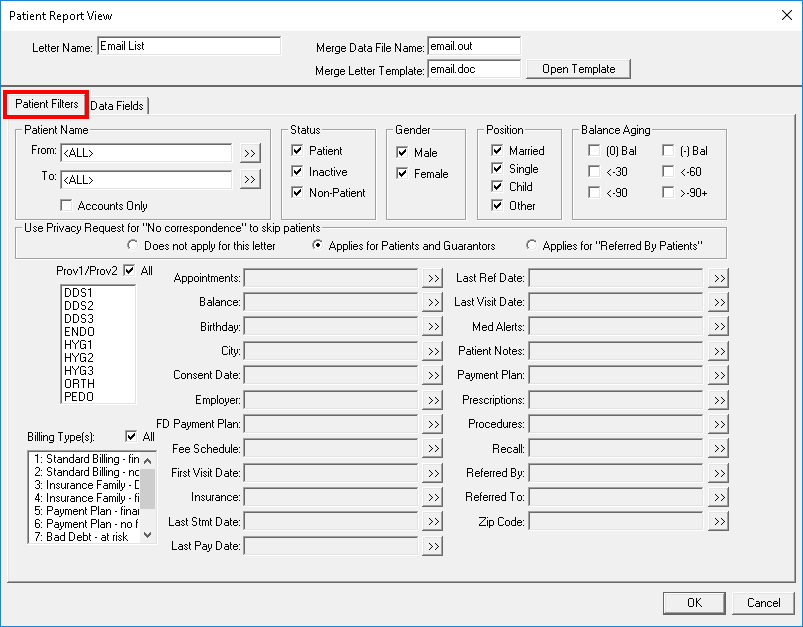
IMPORTANT: If a patient qualifies for all selected filters, they will be included in the list of patients who receive the email. If they do not qualify for every filter, they will not be included on the list. If you want all of your patients to receive the email, set as few filters as possible.
Look at the following Patient Filters:
- Accounts Only (found in the Patient Name section): Sends the email only to patients set as the head-of-household. If you want all patients to receive the email, do not check this box
- Use Privacy Request for “No correspondence” to skip patients: The recommended option here is to select Applies for Patients and Guarantors. This setting will skip any patient who has the “No Correspondence” preference selected in the Patients module. You’ll need to decide if the message you are sending is important enough that you want to override the patient’s preference not to receive correspondence. If so, change the option to Does not apply for this letter.
- Other Filters: Since you want this letter to go to all patients, clear any other filters that have been set.
Next click the Data Fields tab.
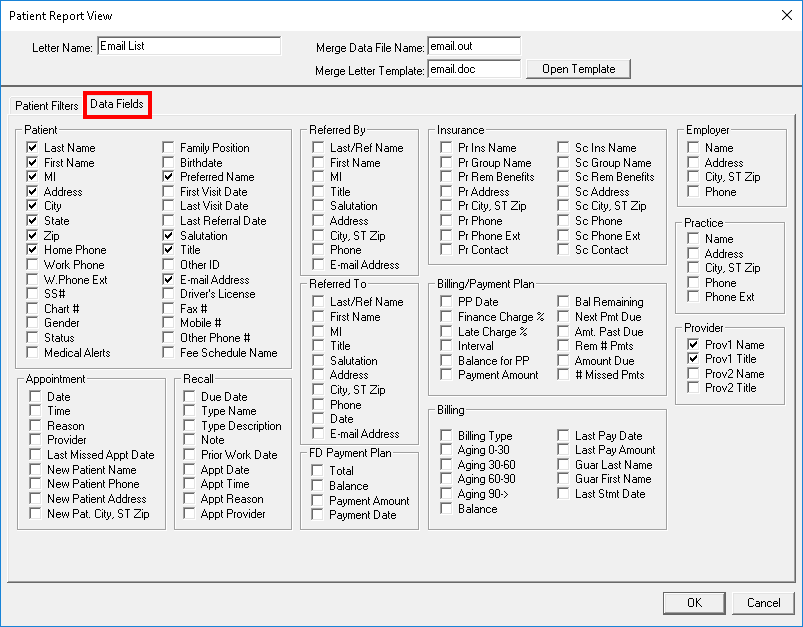
Select the information about the patients that you want Easy Dental to share with Microsoft Word. At a minimum, under the Patient category select E-Mail Address. If you plan to personalize the message by addressing the patient by name, select additional information that you will want to use in the email message. A good choice of selections would include Last Name, First Name, MI, Salutation, and Preferred Name.
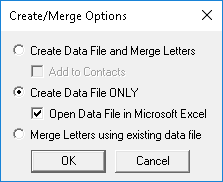
At the bottom of the Patient Report View window, click OK. Then, with your custom email list selected, click Create/Merge. Select the options Create Data File ONLY, select the Open Data File in Excel option, and click OK.
Easy Dental will check through all patients to find the ones who qualify for the filters you selected and open Microsoft Excel with that patient list.
Step 2: Prepare the Email List is Microsoft Excel
In Excel, click the column header labeled EMailAddress. From the Ribbon, choose Data, then Sort A to Z. Select all of the rows of patients without an email address, and delete these rows.
Then click File > Save As, and save the list as a Microsoft Excel formatted file. Remember the location and file name, as you’ll need to know these later.
Step 3: Walk Through the Mail Merge Wizard
Open Microsoft Word to a blank document.
In Microsoft Word select Mailings and then Start Mail Merge. Then select Step-by-Step Mail Merge Wizard. The Mail Merge panel will appear and walk you through seven steps.
- Select Document Type: Select E-mail messages as the document type. Then, at the bottom of the Mail Merge panel, click Next.
- Select Starting Document: Since you have already prepared the email message, select Use the current document. Then, click Next.
- Select Recipients: Remember that Excel file you saved earlier? Now is the time to use it! Select Use an existing list, then click Browse. Find the Excel file and select it. After going through several screen in Word to verify the selection, at the bottom of the Mail Merge panel, click Next.
- Write Your Letter: In the main window, type your message. If you would like to insert the patient’s information into the message, position your cursor in the message where you want it to appear and click Insert Merge Field. Choose the piece of patient information that should be inserted into the message. When you are satisfied with the message, at the bottom of the Mail Merge panel, click Next.
- Preview Your Letters: In the Mail Merge panel, you can click through the recipients and preview how the email message will look to your patients when the merge fields are replaced with their names. When you are satisfied with how this looks, at the bottom of the Mail Merge panel, click Next.
- Complete the Merge: Under the Merge heading, click Electronic Mail. The Message Options dialog will appear.
In the To: line, select EMailAddress.
In the Subject line, type the subject.
Choose your Mail Format. If you have included graphics or font changes, choose HTML. Otherwise, choose Plain Text. - Click OK.
Microsoft Word will deliver the information to Microsoft Outlook to send to your patients.
Cautions:
- Easy Dental Customer Support is not trained in Microsoft Office products. If you experience problems configuring your email through Microsoft Outlook, you’ll need to seek help from your internet service provider, your IT support, or Microsoft.
- Be aware of any laws and regulations regarding sending emails, including anti-spam laws or rules regarding encryption of email messages that contain protected health
information.
Easy Dental and a Web-based Email Service
If you have Easy Dental and use a web-based email service like Gmail, Yahoo Mail, or Outlook.com for your practice email account, you can export a list of patient email addresses to Microsoft Excel and import that file in your mail system.
Step 1: Generate a List of Patients
In Reports, click Letters. Choose a category (for example, Misc.). Click New. Across the top of the Patient Report View window, enter a name for this list (for example, “Email List”).
In the Merge Data File Name field, type “email.out”. In the Merge Letter Template field, type “email.doc”.
Below this are two tabs. Begin in the Patient Filters tab. This area allows you to set up filters that choose who should receive this message.
IMPORTANT: If a patient qualifies for all selected filters, they will be included in the list of patients who receive the email. If they do not qualify for every filter, they will not be included on the list. If you want all of your patients to receive the email, set as few filters as possible.
Look at the following Patient Filters:
- Accounts Only (found in the Patient Name section): Sends the email only to patients set as the head-of-household. If you want all patients to receive the email, do not check this box
- Use Privacy Request for “No correspondence” to skip patients: The recommended option here is to select Applies for Patients and Guarantors. This setting will skip any patient who has the “No Correspondence” preference selected in the Patients module. You’ll need to decide if the message you are sending is important enough that you want to override the patient’s preference not to receive correspondence. If so, change the option to Does not apply for this letter.
- Other Filters: Since you want this letter to go to all patients, clear any other filters that have been set.
Next click the Data Fields tab.
Here, select Last Name, First Name, MI, and E-mail.
At the bottom of the Patient Report view window, click OK. Then, with your custom email list selected, click Create/Merge. Select Create Data File ONLY and Open Data File in Excel, and then click OK.
Easy Dental will check through all patients to find the ones who qualify for the filters you selected and open Microsoft Excel with that patient list.
Step 2: Copy the Email List in Microsoft Excel
In Excel, select the column containing email addresses. Select Copy.
Step 3: Open a New Message in your Email Service
Open your web-based email service. Select the BCC line, and select Paste (instructions may vary by service, but usually this is done by either by right-clicking within the BCC field, or using CTRL+V on your keyboard).


