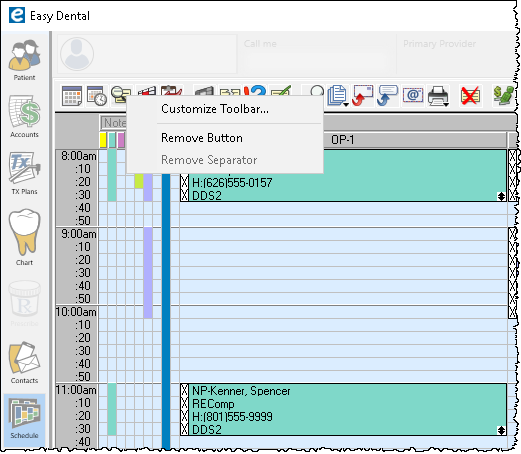
Did you know that you can rearrange toolbar buttons in Easy Dental? On each workstation, you can re-order the buttons into a configuration that makes sense for you. Keep in mind though, that customizing a toolbar only affects the workstation where the customization occurred—not any other workstations.
Here’s how:
- Right-click any button on the toolbar.

2. If you’d like to get rid of the button, select Remove Button. For any other changes, select Customize Toolbar.

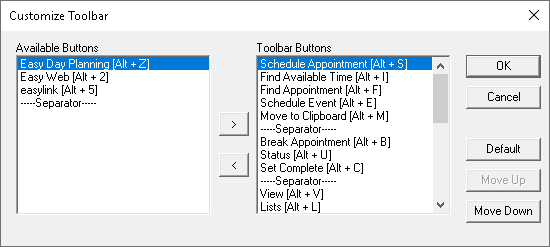
3. The Customize Toolbar window is divided into two sections, Available Buttons (those not currently in use on the toolbar) and Toolbar Buttons (those currently in use). Do any of the following to customize the toolbar:
- To remove a button from the toolbar, select an item in the Toolbar Buttons list and click the < button to move it to the Available Buttons list.
- To add a button to the toolbar, select an item in the Available Buttons list and click the > button to move it to the Toolbar Buttons list.
- To rearrange the order in which a button appears on the toolbar, select an item in the list and click the Move Up or Move Down button until the selected item is in the position you want. Repeat this process for other buttons as needed.
- To return the buttons to the module’s default settings, click the Default button.
4. Use Separators to set up groups of buttons:
- To add a Separator, select the —Separator— option in the Available Buttons list and move it to the Toolbar Buttons list and position it using the Move Up or Move Down buttons as needed.
5. Click OK to save your changes.
Additional Information
- The Toolbar Buttons list, from top to bottom, represents how the button arrangement will appear in the actual Easy Dental module from left to right.
- Buttons that were removed using step 2 above will appear in the Available Buttons list.
- When you move a button from the Available Buttons list to the Toolbar Buttons list, the button is automatically set at the bottom of the list. Move the button within the list as needed.


