Almost everyone in the practice looks at the Schedule daily, but different team members, with varying roles, will want to see different information on the appointment. For example, a scheduling coordinator may want to see patient names, phone numbers, and procedures. A hygienist working in the operatory may only want to see the appointments that will happen in that room. And on a computer that sits somewhat in public view, you may want to hide the patient names or phone numbers for privacy reasons.
You can customize the information that is displayed on appointments by creating unique Schedule views. That way different staff members will have a distinct way of looking at the Schedule and only see the information they care about.
Here’s how:
- From the Schedule toolbar, click View. You’ll see a list of existing views.
- Do one of the following:
- To edit an existing view, click Edit.
- To create a new view, click New.
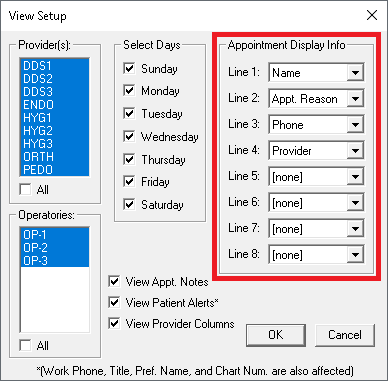
- Under Appointment Display Info, use the drop-down list to set the information you want to view on the appointment and the order in which you want to see it.
- Set other view options as needed, and then click OK to save. The view you just created will be highlighted in the Select View list, and assigned a corresponding function key. Click OK to return to the Schedule.
- Use the function keys (F1-F12) to change the Schedule view to the one you created. The appointment now shows the information you specified in the view.

Based on the appointment length, the appointment displays line 1, 2, 3, and so forth up to line 8. Put the most important items in the earlier lines, as shorter appointments may not show all of the lines of information.


